Please ensure Javascript is enabled for purposes of website accessibility

Category: Physical Therapy

  • Ask a PT: Why do my joints pop and crack when I move?

    Ask a PT: Why do my joints pop and crack when I move?

    Joint crepitation or “popping and cracking” can cause a lot of worry in our patients and may lead to negative health beliefs concerning the crepitations. This is a very common question in our clinics and this blog aims to put an end to the negative health beliefs and reassure our patients that what they are hearing and experiencing is normal as well as explain what is actually happening to make that sensation.

    What does the research say about joint crepitation?

    To this day, there has been no research that has connected a definitive link in between joint crepitus and pathology. According to McCoy et al. 1987, 99% of a cohort demonstrated knee joint crepitus with no reports of knee pain. Another study examined the idea behind habitual knuckle cracking leading to arthritis and found no evidence of a statistically significant correlation. (Castellanos & Axelrod. 1990)

    What is actually causing the noise?

    There are a couple of theories as to what is causing the joint popping and cracking. One of these theories is that it is due tendons snapping over bony protuberances. Another theory is that inside the joints of our body when the bones move on one another, they can create a vacuum that causes a collapse of gas bubbles within the synovial fluid. This can be compared to the sound you hear when opening a jar of jelly and the pressurized air making the popping noise. When it comes to the knee, one of the most common joints to have crepitus, there is believed to be a slip-stick phenomenon; where the movement of the kneecap and femur move on one another and produce vibrational signals. 

    When should I be concerned about the joint noises?

    We certainly understand that joint noise can seem scary, but oftentimes joint crepitus should only be a cause for concern if: there is a sharp pain concordant with the joint crepitation or if you feel the joint has suddenly become less mobile secondary to a joint noise. 

    Changing the narrative

    We have all heard stories of being told that you are going to wear your knees out or thought “I’m too young for this” or “you need to get that checked out,” but these thoughts need to begin to reflect what the evidence states about joint noise. These thoughts can have a negative effect on our health and lead to us being fearful of moving and take away some of our cherished activities. As you can see by some of the research, having joint cracking and popping is a completely normal sensation and should not cause you to stop your physical activity or believe you are damaging your joints. If anything, having joint crepitus is a sign of having healthy and lubricated joints full of synovial fluid, which is great! 

    If your joint noise has you feeling uneasy, then please make a visit with your local Therapydia physical therapist, but we hope this blog will help you feel more comfortable with some of those noises you have been experiencing and be the motivation to get you more active again. 

  • What treatments do physical therapists use for breaking up scar tissue?

    What treatments do physical therapists use for breaking up scar tissue?

    Most people have a scar or two on their skin, but did you know that scar tissue can also develop inside your body? 

    Such areas of scar tissue are called adhesions. Research shows that adhesions are very common after abdominal surgery. One study reports that up to 93% of abdominal surgery patients develop them. Adhesions can also develop in muscles, tendons, ligaments and fascia. Not dealing with scar tissue can lead to chronic pain. It can also cause issues like reduced range of motion and decreased function. However, physical therapists can help you figure out what treatments can be used to break up your scar tissue. 

    Two treatments physical therapists can use for breaking up scar tissue

    Breaking up scar tissue can be a goal for many physical therapy patients. Commonly, this goal exists for people who have just had surgery. It can also be pivotal for athletes recovering from sports injuries or patients healing from car accident injuries. 

    Your physical therapist can help you develop a personalized treatment plan to meet this goal. There are several treatments that these specialists can use to break up adhesions. Two such treatment options are: 

    1. Instrument assisted soft tissue mobilization (IASTM) — This technique involves a therapist moving special metal tools over the problem area. These tools are designed to give the specialist more leverage than using their hands. This makes IASTM especially helpful for older and harder adhesions. One medical study reveals that IASTM helped treat adhesions that reduced hip and knee range of motion (ROM). This study shows that IASTM led to an up to 19% improvement in ROM in the targeted joints. 
    1. Soft tissue mobilization (STM) — STM is a type of manual therapy, which means therapists use their hands to do it. This therapy involves therapists applying therapeutic pressure to the adhesion with their hands. It can also involve moving the hands to apply pressure along the length of the muscle. In other cases, therapists might apply pressure across the grain of the muscle. A survey of nine medical studies on STM for abdominal adhesions reveals that all the studies reported an improvement in scar mobility. 

    Whatcom Physical Therapy can help you find treatments for breaking up scar tissue

    Searching for a physical therapist that offers effective treatments for breaking up scar tissue? Look no further than our team of therapy specialists at Whatcom Physical Therapy. We offer free screenings that can pinpoint the places where scar tissue has developed. Our team can then build you an individualized therapy plan designed to break down adhesions. 

    Our team is currently offering virtual care sessions for patients to get effective therapy without leaving the comfort of their home. 

    Contact our team today for more information or to schedule an initial appointment. 

  • Looking for fibromyalgia treatment options? Try physical therapy

    Looking for fibromyalgia treatment options? Try physical therapy

    A daily battle with pain. Having difficulty sleeping, and constantly walking around in a mental haze. These issues are some of the things that people with fibromyalgia are dealing with. 

    Fibromyalgia is a chronic pain condition that affects up to 12 million people in the U.S. About 90% of the people who suffer from it are women. If you or someone you know has fibromyalgia, you might be looking for fibromyalgia treatment options. Many treatments for this condition are available from a physical therapist. 

    Three fibromyalgia treatment options a physical therapist can offer

    Physical therapy specialists can offer personalized treatment plans for fibromyalgia. Such plans are typically constructed using multiple fibromyalgia treatment options. Three of the most effective of these options are: 

    1. Therapeutic exercises — Many people think that moving less should help reduce their fibromyalgia pain. However, the opposite is often true. Physical therapists can include therapeutic exercises in your treatment plan. These exercises are designed to increase your flexibility and strength, which can help decrease pain. In fact, one medical study reveals that only 41.6% of patients who used therapeutic exercises were still taking pain medication by the end of the study. 
    1. Instrument-assisted soft tissue mobilization (IASTM) — Applying pressure to painful areas can also help fibromyalgia patients. One technique that can do this is IASTM. It involves therapists using specially designed metal tools to apply pressure to the affected area. Medical researchers in one study showed that IASTM helped reduce back and lower limb pain by 40% in fibromyalgia patients. 
    1. Soft tissue mobilization — This technique is a type of manual therapy. It’s similar to IASTM, except therapists use their hands to apply therapeutic pressure to the body. In fibromyalgia patients, soft tissue mobilization (STM) can be extremely effective. One study on STM for fibromyalgia reports that 85% of patients who had it reported fewer aches and pain afterward. 

    Find effective treatment options for fibromyalgia at Armor Physical Therapy

    Don’t know where to turn for effective fibromyalgia treatment options? Look no further than our Armor Physical Therapy team. We offer free screenings designed to reveal exactly how fibromyalgia is affecting you. Using this information, our therapists can build you an effective individualized treatment plan. 

    Not willing to risk exposing yourself to COVID-19? Our team understands completely. That’s why we’re currently offering virtual care and at-home therapy appointments. Both of these options allow you to get the therapy you need without leaving home. Additionally, you can use any of our services without first obtaining a referral from your doctor. 

    Contact us today for more information about how we can help treat fibromyalgia or to schedule your initial appointment.

  • Three benefits of breaking up scar tissue with physical therapy

    Three benefits of breaking up scar tissue with physical therapy

    Sooner or later, most people experience some type of injury that can lead to the development of scar tissue. Scar tissue is tough tissue that develops in your muscles after a tear or incision heals. Because surgery involves incisions in the muscles, it’s normal to develop scar tissue after an operation too.

    Scar tissue is a problem because it is stiff and painful. Over time, it can re-form into normal, healthy tissue, but with the assistance of a physical therapist, you can break up scar tissue more quickly.

    The techniques physical therapists use to break up scar tissue are known as manual therapy. Manual therapy involves the use of your physical therapist’s hands to help mobilize and gently manipulate the soft tissue and joints to reduce pain, improve your range of motion and break up scar tissue. 

    Three major benefits of breaking up scar tissue with physical therapy include:

    1. Reduced pain

    The stiffness of the scar tissue can cause a painful sensation that makes you want to avoid movements that use the muscles with scar tissue on them. Physical therapy can help break up the scar tissue, so you can recover from your injury or surgery with less pain.

    2. Improved range of motion

    Scar tissue is tough and does not flex easily. This limits the flexibility of the entire muscle it’s attached to, which limits the range of motion of your joints connected to the muscle. By breaking up the scar tissue with physical therapy, you can regain some of your range of motion while recovering from the injury or surgery. 

    3. Less dependency on drugs

    One way many people deal with pain is taking pain medication. However, this can be a problem because medications can be addictive and cause unwanted side effects. By treating your pain with physical therapy, you can reduce your dependency on taking medications for your pain. 

    Visit Excel Sports & Physical Therapy for manual therapy

    Are you ready to break up your scar tissue with manual therapy from a physical therapist? Our physical therapists at Excel are highly trained and experienced in providing manual therapy to help treat pain and break up scar tissue. Contact our team today for more information about breaking up scar tissue with physical therapy or to schedule an initial appointment. 

  • How to stop dizziness naturally with physical therapy

    How to stop dizziness naturally with physical therapy

    Feeling faint, woozy, unsteady or weak. All these words are used to describe dizziness. This issue is often a side effect of some medications, but it can also be caused by inner ear problems, dehydration or low blood sugar. 

    It’s estimated that more than 2 million American adults report frequent dizziness. Figuring out how to stop dizziness naturally isn’t as hard as you might think. In fact, it could be as easy as meeting with a physical therapist. 

    How physical therapists can help stop dizziness naturally

    Not dealing with your dizziness can lead to other serious issues. For instance, you’re more likely to fall and injure yourself. Studies report that 3 million seniors go to emergency departments to be treated for fall injuries every year. Often, these falls are the result of a dizziness episode. 

    Learning how to stop dizziness naturally can help you avoid such injuries. Physical therapists can assist you in discovering natural treatment options for dizziness. Typically, these specialists will perform an assessment to determine the cause of your symptoms. They’ll then build you an individualized treatment plan designed to decrease dizziness. Some techniques that might be included in your therapy plan include: 

    • Canalith repositioning — This technique is designed to assist patients with benign paroxysmal positional vertigo (BPPV). BPPV occurs when small crystals in your inner ear are knocked loose, which affects balance. During canalith repositioning, therapists move your head in ways that are intended to reposition inner ear crystals. This can help reduce episodes of dizziness. One study of this technique reveals that up to 80% of patients who used it reported resolution of their symptoms. Therapists can also show you how to perform canalith repositioning on your own. 

    Find out more about how to stop dizziness naturally at Back in Motion

    Not sure how to stop dizziness naturally on your own? Our physical therapists at Back in Motion are ready and willing to help you. Our team offers free screenings that can help you learn the source of your dizziness. We can also build you a personalized therapy plan designed to reduce dizziness and improve balance. 

    Uneasy about coming to our office because of COVID-19? No problem! We offer virtual appointments that allow you to get help without leaving your home. Our team even offers at-home therapy sessions with a physical therapist. 

    Contact one of our front desk coordinators today for more information or to schedule an initial appointment.

  • Unlocking the Perfect Push-Up

    Unlocking the Perfect Push-Up

    By Tony D’Ovidio PT, DPT, OCS, MTC | Therapydia Portland 


    Push-ups are one of the best, most accessible ways to train the upper body. They take no equipment and can be progressed and regressed easily for people of any fitness level. It’s a shame, then, that so many people can’t perform a solid push-up either due to lack of strength or lack of skill. We’re going to fix both problems today by breaking down perfect push-up technique into 5 easy steps, with ideas for correcting common issues people experience. 

    Body position

    Unlocking the Perfect Push-Up Physical Therapy

    This is fundamental to performing a good push-up, and it’s an area that most people struggle with. The push-up is ideally performed in a posterior pelvic tilt – this means the low back should look flat when viewed from the side, not arched with the belly sagging towards the ground. When you’re in the top of a push-up, make sure to draw the belly button in towards your spine and away from the ground. At the same time, make sure to squeeze your butt forcefully. This will assure the proper position of the pelvis and the low back, which makes the whole exercise much cleaner and easier. 

    If you’re having difficulty maintaining a good position, there’s usually two main issues. First is that the muscles of your hips and spine are not strong enough to hold your body in the correct position. If this is the case, you can train them using planks. Hold for time until you can build up to 45-60 seconds, at which point you should be able to do push-ups with a good spinal position. The second common issue is that your chest might not be strong enough. Why would a weak chest cause the back to round? It’s generally easier to do a push down than straight ahead, and by changing the orientation of the chest and arms to point down we have to compensate by arching the lower back. Changing the body position like this also has the advantage of limiting the range of motion of the exercise, making it easier still. If this is the problem, you may have to work on the incline push-up described later in the article.

    Hand position

    This one is negotiable, but we have to make sure that we’re making a conscious choice, not just allowing the body to pick the course of least resistance. We can bias the push-up towards different muscle groups by changing the position of the hands in relation to the body. Our natural inclination is to choose the position that we’re already strongest in, which is, of course, the opposite of what we should do. The standard starting position for the hands is just wider than shoulder width, with the hands inline with the bottom of the pectoral muscle. If we move the hands wider apart, more load will be placed on the pectoral muscles. If we move them forward or closer together, the triceps have to work harder. Moving the hands down towards the waistline targets the deltoids. 

    My recommendation is for beginners to start with the basic position and master it before moving into any of the variations. For those out there able to play around with some modifications, always make sure that you’re conscious of which position you’re picking and why. 

    Forearm and Shoulder Position

    Unlocking the Perfect Push-Up Physical Therapy

    One of the most overlooked cues for the push-up is getting the forearms perpendicular to the ground in the bottom position. This is a simple way to make our pressing more efficient. When our forearms are directed straight into the ground, no energy is wasted, so if we’re pushing into the ground at an angle, we’re making the exercise harder than it has to be. The only challenge here is that we need to think about where we’ll end up in the bottom position of the push-up and most people start from the top. An easy way to figure out where we need to be is to lay face down on the ground and get the hands and forearms set. Then, return to the top position without moving the hands. Once you’re back at the top, you should be set. 

    Unlocking the Perfect Push-Up Physical Therapy

    Now the hands and forearms are set, we can take a look at the shoulders. This is another area where there’s many correct options. Generally, the arms about 30-45 degrees away from the body is a good place to start for the basic push-up. For different variations your shoulder will be closer or further away from the body, which is great. The only position I’d tread with caution is flaring the elbows out more than 45-60 degrees. This position puts more stress on the shoulders and should be reserved for the well-trained only. 

    Head and Neck Position

    Simple but important. The chin should be gently tucked with the nose and eyes pointed straight down. While it may seem unrelated to the push-up, many of the muscles that stabilize the shoulder blade connect directly to the neck. If the head and neck are not in a good position, those muscles will either be working in a stretched or shortened position, which makes their job harder. This can limit your ability to control the shoulder blade, which limits your pressing power. Be mindful that you’re not looking ahead or towards your feet, or poking the chin out. 

    Shoulder Blade Position

    Unlocking the Perfect Push-Up Physical Therapy

    At the top of the push-up, it’s important to push the chest away from the ground, and think about pressing the shoulder blades around the body. This contracts the serratus anterior muscle, which is one of our most important shoulder blade stabilizers. Some people call this extra protraction of the shoulder blade the “push-up plus”. I just consider it part of a well-performed push-up. It’s not a “plus”, it’s mandatory.

    Unlocking the Perfect Push-Up Physical Therapy

    As you move down into the bottom position of the push-up, think about pulling yourself to the ground, and squeezing the shoulder blades down and together as you go. This contracts the middle and lower trapezius muscles, other important stabilizers of the shoulder blades. It’s important to make sure that through the whole motion you’re controlling your shoulder girdle. If we’re not strong through the shoulder blades performing the push-up correctly is going to be very difficult. 

    If you’re having trouble performing the full pressed out position at the top of the push-up, you can practice that motion separately from the exercise. To do so, get into a good position at the top of the push-up, and then let the chest sag down towards the ground without bending your elbows. From here, press the shoulder blades apart and the chest away from the ground. The elbows should stay fully extended the whole time so that the motion comes just from the shoulder blades. Then let the chest sag back down and repeat the process. Make sure to go slowly to develop control. These are a great way to warm up prior to doing a set of push-ups. 

    What if I can’t do any push-ups?

    So you’re in a good body position with a posterior pelvic tilt. Your hands and forearms are set in just the right position. You’re pressing your chest far away from the ground. Perfect! Then you go to lower yourself and only make it a few inches before your arms give out and you faceplant on the ground. Bummer. 

    If push-ups are just too hard to start with, the best way to begin is by doing them on an incline. Find a surface about stomach level to start, and get into basically the same position. Body should still be in a good tilt with the butt squeezed tight, hands just wider than shoulder width. The forearms will be tricky since they’re no longer going to be able to go straight down – think about them pushing directly into the surface and you should get pretty close. Perform the push-up exactly as described, but with the body closer to upright to limit the amount of load on the arms. Can you do 12 like that? Great! Find something about 12 inches lower. If you can’t, practice there until you can do 3 sets of 12-15 reps, then move down. Repeat that process at each level until you’re doing push-ups on the ground. Stairs can work well for this, as can a kitchen counter, chair, or Ottoman.

    Push-ups have stood the test of time as a fundamental exercise, and they’re an awesome way to build the pressing muscles of the upper body. Hopefully this breakdown will help you to clean up your push-up form and address any weak points that are limiting you. As always, the physical therapists at Therapydia are here to support you in your fitness goals. If you’re struggling to move without pain, we’re here to help. 


  • Debunking Health Insurance Benefits

    Debunking Health Insurance Benefits

    If I had a dollar for every time I heard “Physical Therapy is too expensive” or “My deductible is too high”, I would have a lot of dough… Unfortunately, these phrases are common nowadays with how the model of healthcare is changing. Gone are the days of no deductibles, 0% co-pays that you used to see with companies like Microsoft. It means that we need to change the way we think about our health insurance and benefits to better serve ourselves in the future and take on more responsibility for our wellbeing.  

    Can you really put a price on your health? That slight knee pain now, might mean an early knee replacement later, discontinuing running at an earlier age, and increasing heart risk as your cardiovascular health goes down. That occasional urinary leakage with laughing now, could mean wearing depends later in life. Obviously, these are extreme examples, but how we move through life and how we take care of our bodies is going to have a direct correlation on our happiness and our ability to enjoy life as we age. 

    Here’s the real deal… you need to budget for your health on a monthly basis, even if you are young and healthy!

    Here is how to do that:

    1. Go to your insurances website and create an account and sign in -OR- call the 1-800 number on the back of your card. 
    2. From here you will be able to look up or ask for your benefits. You will need to: 

    Find your Deductible

    The total amount you need to spend before your benefits start to kick in, this number can range anywhere from $200-10,000+ depending on if you have a Family Plan vs and Individual Plan and whether you have a High Deductible Plan or a Catastrophe Plan. 

    Find your Co–Insurance % or Co-Pay

    This number is the amount you will pay per visit, it may vary depending on the type of visit, but find the most common number used. A common example would be a 20% co-insurance or a $40 co-pay. 

    Find your Max Out-of-Pocket

    This is the amount of money you will have to spend before your insurance company covers you at 100%, it is often seen as an emergency number, meaning that if for some reason you were to be hospitalized or have a large injury, you would not have too large of a hospital bill. 

    1. One you have all three of those number’s you can create a budget. We are going to use mine as an example.
      1. My Deductible is $2000, I have a 40% Co-Insurance, Max Out-of-Pocket is $5000. My plan starts over every year in January, but some plans may re-set at a different time throughout the year. 
        1. I know I will at least need to save up $2000 in a given year so that I can meet my deductible. After that I subtraction the $2,000 from the $5,000 to get $3,000, and then I know that I will have to pay 40% of those visits/procedures, etc. for a total of $1,200. 
        2. $2000 (my deductible) + $1200 (my 40% co-insurance) = $3,200/12 = $266 per month
        3. The $3,200 is also the given max I will have to spend in a year if I did end up being hospitalized or had a major accident that cost more than my out-of-pocket
    2. Best way to save this money:

    Personal Savings Account

    If your company does not offer a Health Savings Account or a Flexible Spending Account, making a separate account to put money into on a Monthly basis is always a good option. THE BEST PART: if you stay relatively healthy, you will have extra savings or fun money to spend the next year, or you can keep the amount around for the year after and not have to put any money aside! (Remember, your benefits might change each year, so you should re-calculate this number every time your insurance starts over.) 

    Health Savings Account: 

    If your work offers a HSA, take advantage, this works exactly like a personal savings account, except that it is TAX FREE! And in some cases, can be invested while it sits there. In this case, you are given the option to tell your employer how much money you would like to put in here on a monthly or yearly basis, and you will know exactly what that number should be now! HOWEVER: If your employer is contributing to this then, all you have to do is do the math. Take my scenario, I know the max I could pay a year is $3,200, but my employer is contributing $1000, that means I only need to put aside $2,200 per year or $183.33 per month into my HSA. This money can be used for a variety of medical treatments, even ones that may not be included in your benefits, such as medical massages, medications, reading glasses, etc., It can also be used to go out-of-network to a specialist or use a Cash Pay PT service that you would have normally stayed away from in order to stay in-network. This money rolls over every year and you can choose to build it up or contribute less each year, depending on if you want to invest money, or save it up for an emergency. 

    Flexible Spending Account: 

    This is also an account that is offered by an employer, also something to take advantage of and is also TAX FREE! However, this account is different in that you must spend all of this money by the end of the year, occasionally, they will let you use this beyond the first of the year for up to 3 months, but read the fine print because it disappears after that. It also still allows for you to pay for other medical items that maybe you would not have normally budgeted for, but you may want to put less in here if you are not utilizing your insurance as much. For example, in my scenario, instead of putting the full $3,200 into the FSA for the year, I might do just the amount of the deductible, $2000, and then if I do go over that I will pay my 40% co-insurance as it comes. If you know you are going to have shoulder surgery, you might do the opposite and put in the full amount.  

    By planning to meet your depictable and starting that plan at the beginning of the year you do a few things:

    • You take away the barrier to seeking treatment by reducing that scary deductible into an achievable monthly cost, this means you will go to your doctor when you need to, fully participate in therapies, get new glasses, etc, without hesitation!
    • If you stay healthy, you end up with an emergency fund, fun money, investment money and so much more.
    • You open up avenues to spend healthcare money where you want to, vs only staying in-network 

    All and all, you will not regret having this extra money set aside and you will be healthier for it!

    At Therapydia, we also help you plan for your care by letting you know the cost of your visits calculated by using your insurance benefits so that you can budget for your care better. 

    When you schedule, we let you know:

    • How many PT visits per year you have
    • Does PT require a referral
    • What your deductible is and how close you are to meeting it
    • Your co-insurance or co-pay
    • And if you haven’t met your deductible, we estimate how much each visit will cost you until you do

    We also keep a card on file so that you don’t fall behind on payments as well has breaking down your deductible each session so that you aren’t hit with a $2,000 bill!

    Lastly, if you do need to do cash-pay or out-of-network billing, we do the math for you as to which is the most inexpensive option and offer superbills to submit for reimbursement so that the visit goes towards your deductible. 

    To end here are some more definitions of health care benefits that are important to know:

    Premium: This is the amount you and your Employer pay per month to have a particular health plan, your employer may pay 100% of this, but most likely you pay a portion of this in each of your pay checks.

    Superbill: This is a document that includes the date of service, information about the provider, the billing for that visit and more that can be used in addition to a form from your insurance to submit for a visit or service that was a cash pay service. 

    Self-Reimbursement: This is the process of looking up on your insurance company’s website and looking for the form or tab called “Submit a Claim.” The website will then lead you through instruction on how to submit information to the insurance company in order to be reimbursed for a visit. This would be sent in along with the superbill.  

    Authorization: Some insurance companies hire a 3rd party authorization company to manager services provided, this is something that the provider will fill out for you when needed, but you may be sent notifications as to whether visits and procedures were approved after they submit. 

    Specialist vs Primary: Often times different co-pays are applied to your primary care vs a specialist, if you are wondering what the provider considers themselves, ask the front desk, they will know if the provider is considered a Specialist or a Primary Care. 

    In-Network Benefits vs Out-of-Network Benefits: We discussed saving for in-network benefits, but out-of-network benefits can be different than in-network, meaning they may have higher deductibles, higher co-insurances. For example, instead of $2000, it may be $4000 and instead of a 40% co-insurance, it may be a 60% co-insurance. This means that for those providers out of network, you may not meet your deductible as fast and you may be responsible for more of the bill. It is again important to know these numbers so you can budget for a provider that is out-of-network.

    ICD-10 Code: This is the code use to bill for a given diagnosis, such as shoulder pain.

    CPT Code: This is the code used to describe the services build for, such as manual therapy, therapeutic activities, etc. 

    NPI: This number is a national number assigned to each provider or group of providers and is often used to track providers that are in/out of network, credentialing, licensing, etc. 

    Tax ID Number (TIN): This is the number for each office that is used for billing purposes to the insurance company to distinguish one group from the next. 


    By Kelsey Dehmer, PT, DPT, OCS | Therapydia Ballard

  • Exercise and Stress Management

    Exercise and Stress Management

    By Elaina Gayles | Therapydia Lake Oswego

    Stress is your body’s normal response to changing or demanding circumstances. Stress can be a necessary response temporarily, but long term stress can be exhausting and unpleasant. Exercise is one way to manage psychological stress and PTs are advantaged to provide insight into how it helps and which types of exercise to try.

    How does exercise help with stress?

    Exercise releases neurotransmitters called endorphins.

    You may have heard of these mood-boosting hormones that also have a pain-inhibiting effect. Over time, exercise can also improve with regulation of other stress-related substances, such as cortisol and epinephrine (also known as adrenaline).

    Exercise can help with relaxation.

    By stimulating your sympathetic or “fight or flight” nervous system, your parasympathetic or “rest and digest” nervous system can also function more effectively. Some people also report exercising is like meditation in that they are focused on moving their body, rather than on stressful thoughts or their to-do lists.

    Sleep hygiene can improve with consistent exercise.

    Sleep is one of the most important habits to maintain for stress management as well as overall health. Exercise can improve your sleep quality and some report it assists with insomnia.

    Multiple studies have also investigated the effects of exercise on symptoms of anxiety and depression. If one of these conditions may be contributing to your stress state, exercise may be one way to help with management. Of course, consulting with your mental health provider is important if dealing with anxiety and/or depression. 

    Luckily, almost all types of exercise have been shown to be effective to help manage stress. Exercise recommendations for stress management can coincide with ACSM (American College of Sports Medicine) guidelines for amount and type of exercise for regular health maintenance and for prevention of common diseases. They recommend 150 minutes of moderate aerobic activity (such as brisk walking, swimming, light bike riding) or 75 minutes of vigorous aerobic activity (such as running or intense cycling) per week. A combination of moderate and vigorous activity works great, too. They also recommend strength training for each major muscle group at least twice per week. However, starting small is a good idea, especially if you have not been in the habit of exercising.

    What types of exercise help with stress?

    Steady state aerobic exercise

    Walking, cycling, swimming, running, or hiking have shown some of the strongest correlations with decreased stress.

    High intensity interval training

    Such as circuit training, plyometrics, tabata-style workouts, or interval running/cycling are likely to produce a similar effect within a shorter period of time.

    Mindfulness practices

    Yoga or tai chi, often incorporate breathing and meditation which can have a very positive effect on mental health.

    Resistance training or strength training

    Though demonstrating the lowest correlation with improving stress levels, can increase your body’s ability to perform daily tasks, to tolerate other types of exercise, and can have a positive effect on prevention of chronic disease.


    It is important to acknowledge that any movement is better than no movement. The bottom line is to move; even hobbies such as gardening, home improvement, dancing, or playing with kids/pets can be used as exercise. Finding what type of exercise you enjoy most and sticking to it will help in setting yourself up for success. Physical Therapists are experts (we have our doctorates!) on exercise and musculoskeletal health. If you have an injury or any limitation keeping you from moving your best, give us a call to see if we can help.

  • Your Brain On Pain

    Your Brain On Pain

    By Tony D’Ovidio, PT, DPT, OCS, MTC

    Therapydia Portland


    As a physical therapist my day sometimes feels like it revolves around pain. Every 45 minutes I see a new person with a unique complaint, but most of them have the same problem: pain somewhere in the body is limiting them from doing the things and living the life they desire. This being the case, it makes sense that I get asked a lot of questions about why things feel the way they do, or what a certain sensation means. The trouble is, as someone with advanced training and years of experience dealing with pain professionally, I think about it differently than patients do. My goal in writing this article is to change people’s notion of what pain is, how it works, and what it means. 

    Let’s start by taking a look at how most people – many healthcare professionals included – think about pain:

    Your Brain On Pain Physical Therapy

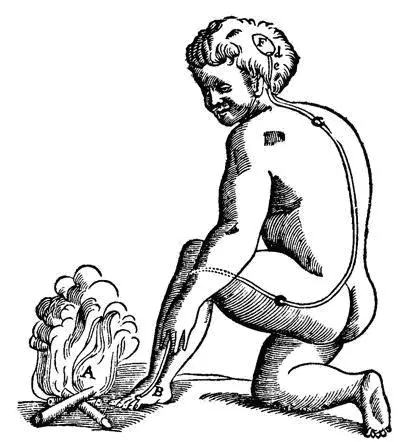
    Above is the classic image depicting the Cartesian model of pain. The boy touches the fire, a signal goes to the brain, and then the child feels pain. It’s simple, it’s easy, and it’s very outdated. Fun fact: the Cartesian model refers to René Descartes, the brilliant mind who brought us “I think, therefore I am”. While it’s beyond me to critique him as a philosopher, our medical knowledge has grown significantly since the 17th century. We’ve left the four humors, leeches, and barber-surgeons in the history books, and, unfortunately for René, it’s time his model of pain joins them. 

    As it stands today, there’s been several new proposed models of pain, with each growing and evolving from the ones that preceded it. We’ve come a long way, but there’s still a great deal that science doesn’t know for sure. Below is a more current model of pain:

    Your Brain On Pain Physical Therapy

    This is referred to as the mature organism model. While there are others, I think that this diagram is the easiest to understand, and it touches on many of the major points of agreement from different models. First, we have some input going to the brain. This input can be many different things: visual information, sounds, or tactile sensations. The next step here differs from the Cartesian model, and it’s crucial – the brain scrutinizes the input in the context of thoughts, emotions, memories, beliefs, culture, and a myriad of other factors. Then, given this complex calculation, the brain decides what output it should create: pain, fear, or a change in behavior to name a few. 

    For example, a hand on the shoulder can mean drastically different things in different contexts. If it’s the hand of a loved one after a long day, you’ll probably welcome it. If it’s the hand of a stranger in a dark alley, you’ll jump, your heart will race, and your body will prepare to defend itself or run away. Same input, different output. 

    Another example is the story of a construction worker in the UK who landed on a nail. He presented to the emergency room in incredible pain, with a nail sticking out of the bottom of his boot. Since the slightest movement of the nail was excruciating, he had to be sedated. Once the physicians were able to remove the nail and boot, they made an incredible discovery: the man’s foot was completely uninjured. When he landed on the nail, it was driven between his toes, missing his foot. While an extreme example, we see that we don’t necessarily need tissue damage to have pain. 

    The flip side of this is that many “injuries” can be asymptomatic. This means that while you may have a lumbar disc herniation, a shoulder labrum tear, or osteoarthritis on imaging, it may not be painful at all. Studies have shown that more than 50% of people without any history or symptoms of back pain will have lumbar disc height loss by age 30, and that by the age of 40, about 50% of people will have a disc bulge(1,2). Similar studies at the shoulder have shown that 55%-72% of people without shoulder pain or injury between the ages of 45-60 have a labral tear (3). We see the similar results at the knee where 19% to 43% of people over 40 have knee OA without symptoms of knee pain.(4) These are only 3 examples of a growing trend – the more studies we do on asymptomatic individuals the more we see that “pathology” is much more common than we thought. 

    The main take-away here is that pain is an output of the brain, not an input from an external sensor, and we can’t necessarily equate pain with damage to the body. We have to think of all the other factors that can modulate the pain experience, and reconcile what we hypothesize is going on biomechanically with the person and their experiences. 

    This is what makes the question, “why does my knee/neck/back/etc. hurt?” so difficult to answer. Is it a meniscal tear? Maybe. Could the fact that a meniscal tear is what ended your brother’s soccer career, and now you’re worried you won’t be able to play again making it worse? Probably. What about not being able to sleep because you’re stressed because your knee pain has put your job at risk? This could be another factor at play that needs to be addressed. 

    As a physical therapist, I don’t get to perform surgery and “fix” people’s pathology. What I do have is the training and time with my patients to examine what factors are really driving a person’s symptoms. This is the hardest and most satisfying part of my job. I hope that by sharing a bit about our modern concept of what pain is and how it works, that people will gain an appreciation for how complex a process the pain experience can be, and that they start to think about themselves holistically in regards to their problems. If they need help navigating this complex process, the physical therapists at Therapydia are here to help. 


    References:

    1. Brinjikji W, Luetmer PH, Comstock B, et al. Systematic literature review of imaging features of spinal degeneration in asymptomatic populations. AJNR Am J Neuroradiol. 2015;36(4):811‐816. doi:10.3174/ajnr.A4173
    2. Ramadorai U, Hire J, DeVine JG, Brodt ED, Dettori JR. Incidental findings on magnetic resonance imaging of the spine in the asymptomatic pediatric population: a systematic review. Evid Based Spine Care J. 2014;5(2):95‐100. doi:10.1055/s-0034-1386753
    3. Schwartzberg R, Reuss BL, Burkhart BG, Butterfield M, Wu JY, McLean KW. High Prevalence of Superior Labral Tears Diagnosed by MRI in Middle-Aged Patients With Asymptomatic Shoulders. Orthop J Sports Med. 2016;4(1):2325967115623212. Published 2016 Jan 5. doi:10.1177/2325967115623212
    4. Culvenor AG, Øiestad BE, Hart HF, Stefanik JJ, Guermazi A, Crossley KM. Prevalence of knee osteoarthritis features on magnetic resonance imaging in asymptomatic uninjured adults: a systematic review and meta-analysis. Br J Sports Med. 2019;53(20):1268‐1278. doi:10.1136/bjsports-2018-099257
  • 5 Things To Know For CrossFit Beginners

    5 Things To Know For CrossFit Beginners

    By Tyler Baca

    Therapydia Beaverton


    As a physical therapist, a CrossFit coach, and a human of the world the biggest barrier to entry for CrossFit is the idea that “I need to get fit to try CrossFit.” This is completely understandable given that the social media around CrossFit is filled with videos and pictures of crazy stunts on suspended rings or barbells with insane amounts of weight on them. However, this is such a small sliver of the fitness that goes on in a CrossFit gym. 

    Most CrossFit gyms will have a program in place (i.e. “On Ramp” or “Foundations”) for new members to help them learn and develop the skills surrounding CrossFit. The purpose of these are to acquaint you with the exercises and discuss the way classes flow for their specific gym. Other gyms may have new members participate in a regular class and assign an extra coach to guide and teach you the movements necessary for the day. This process is unique to each CrossFit gym, so when you are exploring options in your area make sure that you ask a potential gym about their new member process. 

    Furthermore, most gyms will have a specific workout posted for the day with a prescribed number of rounds, repetitions, or time limit. These values help set a stimulus for the workout: maybe you are looking at a short and fast workout or a longer duration workout where you need to pace appropriately. In addition, if there is a weightlifting component involved, then there will be a prescribed weight to be used for the specific workout. 

    These parameters mentioned above are recommendations for regular members. If you are new to CrossFit, it is important that you discuss with the coach what weights or movements are appropriate for the daily workout given the prescribed sets/reps/time domain. A CrossFit coach should have alternative exercises or modifications for the prescribed workout to help you complete the work safely and effectively. A common thread between the crossfit coach and the physical therapist is the process of teaching the mechanics of the movements, then coaching consistency of movement, followed by increasing intensity of the movements. The intensity of any movement cannot be progressed until a solid foundation is built. 

    1. You will feel sore the day afterwards, but this is a great thing for the human body.

    As to be expected with trying any new sport or physical activity, you will be sore the day following your first CrossFit workout… maybe even the first couple of weeks. To make a very long explanation short, soreness usually means that there has been some breakdown of our muscle tissue and it is in the process of being replaced with even stronger muscle tissue. The body is going through its inherent pattern of adapting to the stresses that are being demanded of it, otherwise known as muscle growth. CrossFit movements tend to mimic functional movements that we see throughout the day, thus we are strengthening muscles and movements to support daily life. 

    However, persistent soreness or an ache in a more localized area of the body could mean that your technique with certain movements may be leading to overuse. For instance, if you cannot keep your heels on the floor while squatting, you may be subject to some discomfort in the knee from a lack of flexibility in the ankle. I would recommend reaching out to a coach or physical therapist at this point to discuss options to improve technique. At Therapydia, our physical therapists are movement experts who are familiar with proper execution of the movements seen in the CrossFit gym. 

    2. Make sure to be hydrated and fed prior to exercise.

    This tip is also true of any exercise routine. It is recommended that you have some source of calories prior to exercise. As you continue to increase the intensity of exercise, your body will rely even more on the macronutrients provided from food to sustain your energy. I would also recommend bringing a water bottle to stay hydrated throughout the session.

    3. If you did not like today’s workout, tomorrow’s will be completely different.

    One of the principles of CrossFit is that the work done “constantly varied.” This means that if you do a workout on your first day for 15 minutes with push ups, sit ups, and jump rope; then the next day is likely to have completely different movements, a different time or rep scheme, and possibly a different intensity goal. As you continue to progress through the sport, you will find movements or rep schemes that you enjoy and ones that will challenge you greatly. The constant flux along this spectrum helps shape members into strong well-rounded athletes.

    4. Be open to new experiences. 

    While I cannot speak for all CrossFit gyms, I will say that they do tend to gather a group of outgoing and friendly people. Unlike other group exercise classes, people are going to introduce themselves to you and want to know more about you. Even though you may not be doing the same parameters of exercise as another individual in the class (as discussed above), most people still end up sweaty and out of breath by the end of the workout regardless. This shared experience creates more to chat and/or gripe about with other classmates. These connections begin to add up as you continue to see familiar faces during CrossFit classes. Be prepared to socialize as part of the CrossFit experience. 

  • Blood Flow Restriction Therapy FAQs

    Blood Flow Restriction Therapy FAQs

    By Tyler Lusignan

    Therapydia NOLA

    Blood Flow Restriction Therapy or BFR is a brief and intermittent occlusion or restriction of arterial and venous blood of the upper or lower extremity (arm or leg). BFR can be used to augment skeletal muscle adaptation, promote systemic metabolic and cardiovascular changes while at rest or with low intensity endurance or resistance activities. BFR has been found to be safe when applied with pressures relative to the cuff and when used with individualized limb occlusion pressures. 

    Question: How does blood flow restriction therapy work?

    Answer: BFR works in simplest terms by promoting muscle hypertrophy at low loads. Historically, building muscle required working out at a higher percentage of an individual’s one rep max (typically 70% of 1RM) or lower percentages (30-50% of 1RM) until failure. Researchers have shown that training with BFR at 20-40% of 1RM can produce similar hypertrophy results. While traditional thoughts about building muscle were centered around mechanical stress, BFR has introduced the idea of metabolic stress producing similar results. The exact physiological mechanism for this is not fully understood at this time, but the most consistent theory states that the BFR promotes greater metabolites that elicit an anaerobic response in the muscle and as a result muscle swelling and muscle fiber recruitment occurs. 

    Question: When is it used?

    Answer: BFR can be used for anyone who is attempting to build muscle and return to their prior level of functioning. BFR should not replace high load resistance training altogether, but rather be a bridge to lifting heavier weights when an individual can not tolerate heavier weights. BFR can be used by those individuals who have undergone recent surgery and need to protect their surgical site. This protection period of time requires avoiding heavy weights, but with BFR lighter weights can be used to elicit hypertrophy gains in as little as four weeks while still protecting the surgical site. BFR can also be used in the elderly population who may be experiencing deconditioning and want to begin strengthening again. Finally, BFR can be used in the healthy and athletic population. This population can promote muscular metabolic adaptation while also decreasing training loads and promoting activity longevity and performance enhancement via neural adaptations. 

    Question: What are the benefits of Blood Flow Restriction Therapy?

    Answer: The benefits of BFR therapy include:

    • Improved muscle mass
    • Improved muscle strength
    • Improved cardiovascular endurance 
    • Increased positive bone density metabolites
    • Increased functional outcomes
    • Increased self efficacy 

    Question: Is Blood Flow Restriction Therapy a safe practice?

    Answer: When used in a controlled environment and by trained professionals, BFR is a safe training alternative to a wide variety of individuals with varying training levels. To determine a participants level of risk, a numerical scale is used to ensure patient/client safety concerning BFR contraindications. 

    Some of these contraindications include: 

    • History of DVT
    • Acute sickness or fever
    • Currently pregnant 
    • High blood pressure (>180/100 mmHG)
    • Early post-op periods 
    • Cardiovascular disease – high class arrhythmia or coronary ischemia 
    • Rhabdomyolysis
    • Varicose veins 

    Some precautions include: 

    • Subcutaneous hemorrhage 
    • Extremity numbness
    • Delayed Onset of Muscle Soreness (DOMS)
    • Feeling cold or Raynauds 

    If BFR is something you are interested in and or have questions about, please feel free to make an appointment at your local Therapydia. We have certified and trained physical therapists that will help you implement BFR into your routine and get you back to your physical activity goals quicker and stronger than ever! 

  • 5 Yoga Poses For Increased Mobility

    5 Yoga Poses For Increased Mobility

    Mobility is the ability to control the movement in your joints, muscles, and tendons throughout their entire available ranges of motion. Mobility is similar to flexibility, but mobility incorporates both flexibility and strength. Mobility training can help reduce risk of injury and optimize performance as muscles perform better and can contract more forcefully when they are able to reach their full ranges of motion. One popular way to increase mobility is through yoga poses or “asanas.” With each of these movements, you can hold the pose for at least 30 seconds and up to 2-3 minutes daily to improve mobility.


    Cat-Cow Pose (Chakravakasana)


    Cat-Cow pose is a great way to improve spinal mobility and abdominal strength. You can work on abdominal strengthening by focusing on contracting the transverse abdominis with the “cat” portion of the pose. This pose can also help with lumbo-pelvic dissociation, or the mobility between your lower back and your pelvis.

    How to do this move:

    Start in a table top position on your hands and knees with your wrists underneath your shoulders and your knees underneath your hips. Then, arch the back up toward the ceiling (cat) while focusing on bringing your belly button in toward the spine. You should feel a stretch all along your back. Then, arch your back the opposite way (cow), bringing your belly toward the floor. 

    Downward Facing Dog (Adho Mukha Svanasana)


    Downward Facing Dog works on the posterior chain, including the gluteals, hamstrings, and calves. Posterior chain mobility is important for maintaining posture and balance. This pose can also help with ankle mobility and shoulder stability. 

    How to do this move:

    Start in a table top position on your hands and knees with your wrists underneath your shoulders and your knees underneath your hips. Then, tuck your toes and lift your hips toward the sky. Try to bring your heels as close to the floor as you can. Try to push evenly between hands and your feet. You should feel a stretch throughout the back of the legs.


    Thread the Needle (Parsva Balasana)


    Thread the Needle pose works on both shoulder and thoracic mobility, which are important for both posture and most sports performance, including golfing, running, tennis, and volleyball, to name a few. This pose helps to increase thoracic rotation and posterior shoulder mobility.

    How to do this move:

    Start in a table top position on your hands and knees with your wrists underneath your shoulders and your knees underneath your hips. Then, reach the right arm out to the side and then slide the right arm underneath your left arm with the palm facing up, twisting through your torso. Your right shoulder should come down to the mat and you can rest your right ear or cheek on the mat as well. Hold and then repeat on the opposite side.


    Garland Pose (Malasana)


    Garland pose, also known as “deep squat,” targets a variety of body parts including the hips, groin, knees, ankles, and torso. This pose can help to improve flexion mobility through the hips, knees and ankles as well as extension mobility though the torso. 

    How to do this move:

    Standing on your mat, bring your feet slightly wider than hips-distance apart. Bend through the knees, bringing your buttocks toward the floor coming into a squat. Toes can be facing slightly outward. If your heels do not stay on the ground, feel free to add a prop or towel underneath the heels to help you relax. Bring your forearms to the insides of your thighs and with your hands in a “prayer” position, slightly push your forearms into your thighs for a deeper stretch through the groin.


    Gate Pose (Parighasana)


    Gate pose is primarily a stretch for your side body, including the intercostal muscles between your ribs, the obliques, and the latissimus muscles. It can help to improve core stability and mobility throughout the spine.

    How to do this move:

    Starting in a kneeling position, extend your right leg out to the side, keeping your foot flat on the ground. Then, reach your left arm up straight toward the sky and slowly lean toward the right over your extended leg, keeping your palm facing the right side. You can use your right hand as support on your right leg for balance. Hold and repeat on the opposite side.

    These are just a few yoga poses that can improve mobility. If you have any questions on mobility training or how it may affect your performance, feel free to contact our trained physical therapists at Therapydia.

When Was Your Appointment?

We recently changed bill pay providers. Please click the button for the date of your appointment to be directed to the correct online payment portal.